Spire Tutorial - a second example
This project, defined by the configuration simple2.xml, has a larger set of batch files distributed in 3 subdirectories. A reference volume of a ribosome is supplied (reference_volume.dat). A test data set of noisy, ctf-modified particle images is generated from this volume using random angles and shifts. Then a set of reference images is generated from the same volume using equally spaced angles. The test images are then aligned with the reference images.
-
cd to a working directory, and run spire: spire &
-
In Spire's main window, under the Project menu, select New.
-
Fill in the required fields in the Project window. Type in 'dat' as the data extension. For the Configuration file, select
simple2.xml.
When you hit 'OK', the project directory is created. The configuration specifies 3 subdirectories (Align, Proj, Testdata), as well as the batch files in each. (see the <Directories> tag in simple2.xml)
-
In Spire's main window, under the Dialogs menu, you will see 3 dialogs: Test data, Proj, and Align. Note that the dialogs correspond to the project subdirectories, although this is not required. (You only need to run the "rename reference" batch file if you selected a data extension other than 'dat'.)
-
Select the Test data dialog.
-
Run the 4 batch files in SPIDER by clicking on their buttons. Or, you may click a batch file's EDIT button to view/change parameters. Note that if you change a batch files output, say
img001 to img999, then any other batch files expecting img001 as input need to be edited to have the new value.
These batch files are run in the Testdata directory:
| randangles.spi | make a doc file of random angles and shifts |
| makectfvol.spi | make a CTF-multiplied volume for generating test images |
| gendata.spi | generate projection images from the CTF-volume |
| addnoise.spi | add noise to the randomly generated test images. |
-
Close the Test data dialog.
-
Select the Proj dialog.
-
Run the 3 batch files in this dialog; they are run in the
Proj directory:
| mkrefangles.spi | create a document file of equally-spaced reference angles |
| refproj.spi | create projection images from the volume using the reference angles |
While a SPIDER process is running, Spire displays a Spider process window. This lets you monitor the state of the SPIDER process by displaying the last few lines of the results file (via the "check progress" button).
-
Close the Proj dialog.
-
Select the Align dialog.
-
These batch files are run in the
Align directory:
| apsh.spi | align the shifted, rotated test image with the reference projections |
| align.spi | apply the obtained alignment parameters to the image, creating an aligned image. |
| compare.spi | compare the aligned images to their corresponding reference images. |
-
Close the Align dialog.
-
View the batch runs and data files for this project. In the Commands menu, select View project. The project viewer will display. The upper pane of this window lists all the batch runs (successfully completed SPIDER jobs) of the project. Each batch run has a unique ID number.
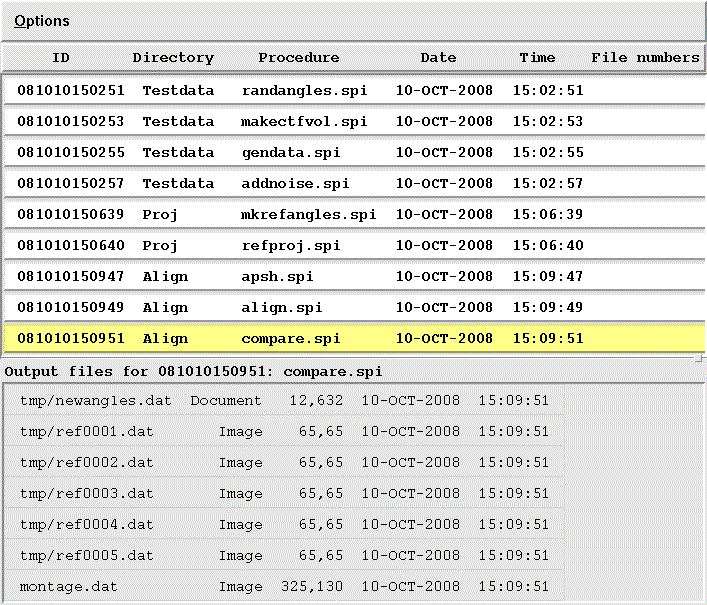 The lower pane displays the output files for a selected batch run. Output files may be displayed by clicking on them; images and volumes are displayed in Jweb, while documents are opened in a text editor. If Jweb doesn't automatically open from the Project viewer, try starting it by selecting Commands --> Open Jweb. Click on the last batch file, compare.spi. View the file montage.dat
-
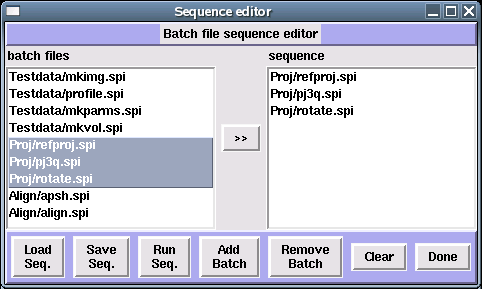
Create a sequence for this project. Sequences let you run multiple batch files. Under the Sequences menu, select Create. The Batch file sequence editor shows all of a project's batch files in the left window, files selected for the sequence appear in the right window.
-
Select all of the batch files on the left, add them to the right with the >> button. If the file
reference_volume.dat appears on the right, you can't run that as a batch file - select it and click Remove Batch.
-
Save the sequence: click the Save Seq. button, and save this sequence, giving it a name, e.g.,
allfiles.seq. Close the Sequence Editor window (Done).
-
Run the sequence: under the Sequences menu, select Run. Select the sequence you just created. The batch files will be executed in the order specified by the sequence. If any batch file crashes (yes, this has happened to some people!), the sequence aborts at that point.
-
If you open the project viewer, you will see that the sequence batch files have been added to the project.
-
Save a description of the project in a set of web pages
Under the Project menu, select Save as html. Give the top-level project web page a name, such as proj001.html, enter any notes pertaining to the project, and hit 'OK'.
Spire creates a main project html page, listing all the batch runs in this project. Each batch run has a link to a page showing the files created by that run.


